The material composition of 6mm hex head bolts also contributes to their popularity
...
2025-08-15 07:19
2613
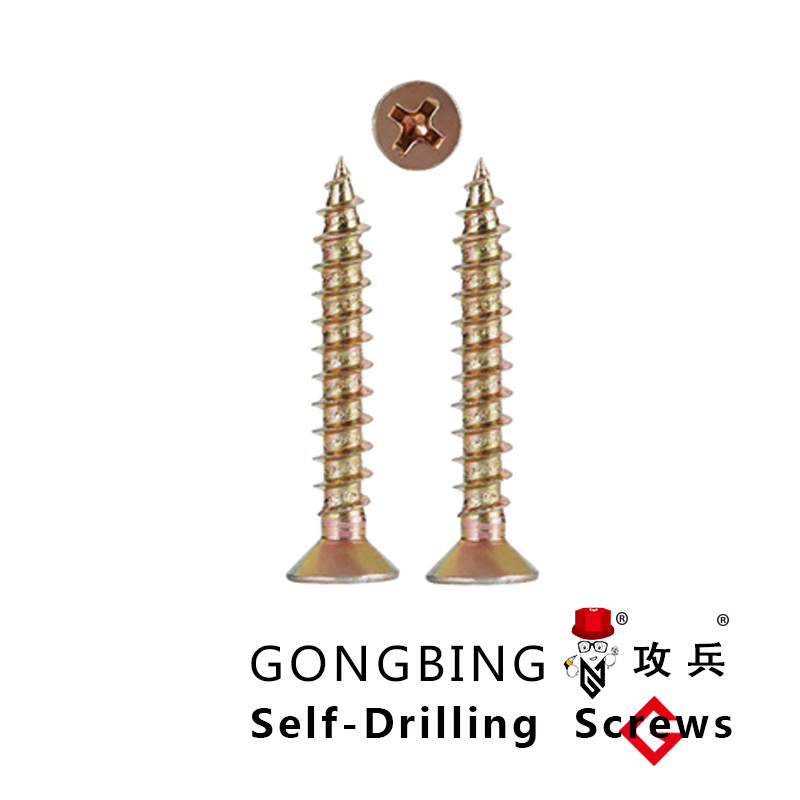
Self-drilling screws, often referred to as self-tappers, are specialized fasteners that eliminate the need for pre-drilled pilot holes. They are engineered to create their own hole as they are driven into materials, making them a preferred choice for various applications in construction, manufacturing, and DIY projects. Among these, 2% self-drilling screws have gained popularity due to their unique advantages and specifications.
 This preload, known as 'prestress,' is what gives these fasteners their exceptional load-bearing capacity This preload, known as 'prestress,' is what gives these fasteners their exceptional load-bearing capacitya325 fasteners.
14g Tek screws are self-drilling screws designed for fastening materials in various construction projects. The 14g denotes the gauge of the screw, which translates to a diameter of approximately 0.080 inches (2.3 mm). Tek screws are particularly known for their sharp, self-drilling points, which allow them to drill into materials without the need for a pre-drilled pilot hole.
Tóm lại, việc thay đổi từ phanh trống sang phanh đĩa là một quyết định đúng đắn nếu bạn quan tâm đến độ an toàn và hiệu suất của xe. Mặc dù chi phí có thể cao, nhưng lợi ích mà nó mang lại thường xứng đáng với số tiền bạn bỏ ra.
Zelfs als je geen van de bovenstaande symptomen opmerkt, is het goed om de leeftijd van je remdrums in gedachten te houden. Veel fabrikanten raden aan om remdrums elke 50.000 tot 70.000 kilometer te vervangen, afhankelijk van rijomstandigheden en gebruik. Regelmatige inspectie en onderhoud zijn belangrijk voor de veiligheid en duurzaamheid van uw voertuig.
2. Materialer
How Thick Should Drum Brake Pads Be?When it comes to vehicle safety, the condition of your brake system is paramount. Drum brakes, although less common in modern vehicles compared to disc brakes, still play a vital role, especially in older models and certain types of vehicles. One critical component of the drum brake system is the brake pads, specifically the thickness of these pads. Understanding how thick drum brake pads should be can help ensure optimal braking performance and safety.Drum brake pads, often referred to as brake shoes, work by pressing against the inner surface of a rotating drum to create the friction necessary to slow or stop the vehicle. Over time, these pads wear down, and their thickness diminishes. Typically, new brake pads start with a thickness ranging between 0.2 to 0.7 inches, depending on the vehicle model and manufacturer specifications. As the pads wear, their effectiveness decreases, which can lead to a longer stopping distance and ultimately compromise vehicle safety.Most automotive experts recommend replacing drum brake pads when they reach a thickness of 0.1 inches. At this point, the pads have significantly worn down and may no longer provide adequate friction, which can not only affect stopping power but also damage the drum itself. It’s crucial to regularly check the thickness of your brake pads as part of routine vehicle maintenance.Several factors influence how quickly your drum brake pads wear down, including driving habits, load weight, and the types of roads you frequently drive on. For example, stop-and-go traffic or heavy loads can accelerate wear, leading to more frequent inspections and replacements. Conversely, steady highway driving generally results in slower pad wear.To check the thickness of your drum brake pads, you can do a visual inspection or consult with a professional mechanic. Many mechanics recommend having your brake system checked every 12,000 to 15,000 miles or during each vehicle service. This can help catch potential issues before they become serious problems, ensuring your vehicle remains safe and reliable.In summary, maintaining the proper thickness of your drum brake pads is crucial for safe vehicle operation. New pads typically range from 0.2 to 0.7 inches and should be replaced when they reach 0.1 inches. Regular inspections and understanding the factors affecting your brake pads can help you make informed decisions about maintenance and replacements. Always prioritize safety by ensuring your brake system is in excellent working condition – your life and the lives of others on the road depend on it.

Bakit Kailangan ang Pagpapalit ng Wheel Stud?
1. Understanding Drum Brakes
Understanding Minimum Brake Drum Thickness Importance and Maintenance
Conclusione

معایب ترمز درام
Schritt 4 Alte Bremsbeläge entfernen
Drum brake cables are essential parts of the drum brake system, primarily found in older vehicles and some modern designs. These cables connect the brake levers to the brake shoes, responsible for applying pressure to the drum when the brakes are activated. The mechanism consists of several key components, including the cable, lever, and linking brackets. When the driver presses the brake pedal, it activates the hydraulic system, which then pulls the cable, causing the brake shoes to expand and press against the inner surface of the drum, resulting in deceleration.
A Importância da Mudança nos Freios a Tambor
V posledních letech se stává stále populárnější trend přetvářet staré automobilové součásti na originální kousky pro zahradu a venkovní prostor. Jedním z takových inovativních projektů, který si získává srdce mnoha milovníků outdoorových aktivit, je vytvoření ohniště z brzdového bubnu kamionu. Tento netradiční kousek nejenže přidá styl a osobitost do vaší zahrady, ale také nabídne praktický prostor pro posezení u ohně s rodinou a přáteli.
Understanding the cross-referencing of the 89996B brake drum is essential for anyone involved in vehicle maintenance and repair. By utilizing available resources for cross-referencing part numbers, vehicle owners and mechanics can simplify the process of finding suitable replacements. This not only saves time and money but also enhances the safety and reliability of your vehicle’s braking system. Proper research ensures that you choose the right brake drum for your needs, paving the way for safe and effective driving experiences.
Signs of Worn Brake Drums and Shoes
The Ruckus drum brake adapter is an essential upgrade for those looking to enhance their scooter's performance, safety, and aesthetics. By allowing the installation of larger or more efficient brake systems, this component provides riders with better stopping power, heat management, and customization options. As with any upgrade, ensuring compatibility and proper installation is key to reaping the full benefits of enhanced braking performance. For enthusiasts and everyday riders alike, investing in a drum brake adapter could mean the difference between a good ride and a great ride.
중형 트럭의 브레이크 시스템은 운전의 안전성과 효율성에서 매우 중요한 역할을 합니다. 그 중에서도 브레이크 드럼은 차량의 제동력과 직접적으로 연결된 핵심 부품입니다. 브레이크 드럼을 교체하거나 점검할 때, 적절한 도구와 장비가 필요합니다. 이를 위해 중형 트럭 브레이크 드럼 리프터가 필수적입니다.
Le remplacement des plaquettes de frein à tambour est une opération cruciale pour garantir la sécurité de votre véhicule. Les freins à tambour, bien que moins courants sur les véhicules modernes, sont toujours utilisés sur de nombreux modèles, en particulier les voitures anciennes et certains véhicules utilitaires. Comprendre quand et comment remplacer ces plaquettes peut faire une grande différence en matière de performance et de sécurité.Tout d'abord, il est important de savoir quand les plaquettes de frein doivent être remplacées. Généralement, vous devriez inspecter les freins tous les 20 000 à 30 000 kilomètres ou dès que vous remarquez des signes d'usure, comme un bruit de grincement ou une diminution de l'efficacité du freinage. Un frottement anormal, une pédale de frein molle ou des vibrations lors du freinage peuvent également indiquer qu'un remplacement est nécessaire.Le processus de remplacement des plaquettes de frein à tambour peut être réalisé par soi-même, mais il nécessite quelques outils spécifiques, notamment un cric, des clés à molette, et un jeu de tournevis. Avant de commencer, assurez-vous d'avoir à portée de main des plaquettes neuves, car il est souvent conseillé de remplacer les deux côtés pour maintenir un équilibre dans le système de freinage.Commencez par lever le véhicule et retirer la roue. Une fois la roue enlevée, accédez au tambour de frein. Vous devrez probablement retirer quelques boulons pour pouvoir enlever le tambour. Inspectez l'état des plaquettes existantes et du tambour lui-même. Si le tambour est usé, il peut être nécessaire de le remplacer ou de le rectifier.Pour retirer les anciennes plaquettes, dévissez les attaches et retirez-les soigneusement. Installez les nouvelles plaquettes en veillant à respecter le bon positionnement. Remettez tout en place en vous assurant que tout est bien fixé. Terminez le processus en remettant la roue et en abaissant le véhicule.Avant de prendre la route, testez le système de freinage à basse vitesse pour vous assurer que tout fonctionne correctement. Un bon entretien des freins à tambour peut prolonger leur durée de vie et assurer votre sécurité sur la route. Si vous n'êtes pas à l'aise avec cette procédure, il est toujours recommandé de consulter un professionnel. N'oubliez pas que des freins en bon état sont essentiels pour la sécurité de tous les occupants du véhicule.

How Long Do Drum Brakes Last?
When it comes to maintaining and repairing your vehicle's braking system, having the right tools is essential. One vital component of many vehicles is the drum brake system, which relies on a set of specialized tools to ensure proper maintenance and repair. If you're a DIY enthusiast or a professional mechanic looking for reliable tools for drum brakes, O'Reilly Auto Parts is a go-to destination for high-quality automotive supplies.
With the wheel removed, examine the brake drum for any visible signs of wear or damage. If you notice any issues, it may be best to consult a professional. However, if everything looks normal, you can proceed with the next steps.
En annan faktor som kan påverka kostnaden är bilmärket och modellen. Vissa bilar kan ha mer avancerade bromssystem eller specifika komponenter som gör det mer tidskrävande och kostsamt att vända bromstrummorna. Om din bil har ABS eller andra avancerade bromssystem kan det också påverka processen och kostnaden.

3. Measure the Brake Drum Diameter
The ability of disc brakes to disperse heat rapidly is crucial for maintaining braking performance. The open structure of disc brakes allows for better airflow, thus cooling down the system more efficiently. This characteristic is particularly vital during repeated braking events, such as in downhill driving or in heavy traffic, where the brakes might otherwise overheat. By minimizing the risk of brake fade, drivers can enjoy a safer and more responsive braking experience.
Step 4 Inspect Components
1. Heat Resistance Regular paint may not withstand the high temperatures generated by brake drums. It's imperative to use high-temperature paint that can resist the heat without peeling or bubbling. Specialty paints designed for automotive applications are recommended.
Converting from drum brakes to disc brakes is a project that requires careful planning and execution
. Here are the key steps typically involved in the processComponenti Principali
5. Reassemble and Test
1. Regular Inspections Have your brake system inspected routinely by a qualified mechanic. This allows for the identification of issues before they escalate.
- Disc brake conversion kit (specific to your vehicle model)
Además de las medidas, el gráfico incluye información sobre los materiales utilizados en la construcción de los tambores de freno. La elección de un tambor de freno de alta calidad, como los fabricados por Conmet, significa que se está optando por un producto que ofrece durabilidad y resistencia al desgaste. Conmet utiliza tecnologías avanzadas en la producción de sus tambores, lo que se traduce en un rendimiento superior en comparación con productos de menor calidad.

Rostige Bremstrommel entfernen Eine Schritt-für-Schritt-Anleitung
The short answer is yes, you can paint brake drums
. However, there are several considerations and precautions to keep in mindNeon Lighting Aesthetic and Functional
The drum brake assembly also includes a return spring that ensures the brake shoes retract to their original position once the brake pedal is released. This spring is vital for preventing drag, which can lead to premature wear and overheating of the brake components. Additionally, the brake system may incorporate adjusters that automatically compensate for wear of the brake shoes, maintaining optimal braking performance over time.
ประโยชน์ของการปรับจานเบรกหลัง
Een ander teken dat uw remdrums vervangen moeten worden, is als er olie of vuil op de remvoeringen of drijfstangen staat. Dit kan de remprestaties negatief beïnvloeden en leiden tot oververhitting van de remmen. Als dit het geval is, moet u niet alleen uw remdrums controleren, maar ook de oorzaak van de vervuiling aanpakken.
Signs That Your Drum Brakes Need Attention
Step 3 Remove the Brake Drum
Importance of Heavy Duty Brake Drums
3. Access the Brake Assembly Remove the brake drum by unscrewing any retaining screws or clips. Inspect the drum for visible damage, such as cracks or excessive wear.

Understanding Rear Brake Drum Replacement Cost